


Parallettes & Handstand Bars


Prices incl. VAT plus shipping costs
Ready to ship today,
Delivery time appr. 1 - 3 workdays
- Einfache und schnelle Montage
- Robust und pflegeleicht
- Rutschfestes Material


- Order number: 00HSB40
- EAN 4260536840273
Parallettes / Handstand bars – the key to real calisthenics progress at home
For those looking to build strength, learn the handstand, or finally achieve clean handstand push-ups without having the space for large training equipment, these parallettes (handstand bars) are exactly the right tool.
Compact. Stable. Effective.
Designed for calisthenics athletes who do not want to make compromises at home.
Why parallettes are more than just „small parallel bars“
Training on the floor has its limits.
With parallettes, these limits are pushed – a difference that is felt with every repetition.
The elevated grip position allows for a deeper range of motion, cleaner execution, and significantly more body tension.
The result is increased strength, improved technique, and faster training progress.
Ideal for handstands & handstand push-ups
Handstand training often fails not due to a lack of motivation, but because of aching wrists, unstable balance, or a lack of freedom of movement.
Handstand bars solve exactly these problems.
The neutral grip position significantly reduces the strain on the wrists.
The additional height enables clean negative handstand push-ups.
The stable base ensures greater control during handstands.
Especially the final, most difficult centimeters of a handstand push-up can be trained specifically on parallettes – safely, in a controlled manner, and without unnecessary frustration.
One tool – many exercises
With parallettes / handstand bars, the entire upper body and core workout can be covered:
-
Push-ups (deeper and more intensive)
-
Pike push-ups
-
Handstands and handstand push-ups
-
Dip variations
-
L-sits and core exercises
-
Planche basics
Whether for beginners or advanced athletes – the equipment perfectly adapts to any training level.
Perfect for home use
After the workout, the parallettes are simply stored away.
Under the bed, in the closet, or in the corner.
No reconfiguration. No clutter. No space issues.
The living room turns into a training space whenever it is needed.
Who are these parallettes / handstand bars suitable for?
For calisthenics athletes
For handstand and HSPU training
For functional strength training at home
For anyone with limited space but ambitious goals
Conclusion
A gym is not required.
A large setup is not required.
What is required are parallettes that actually work.
These handstand bars provide more control, more depth, more body tension, and more progress.
Minimal space required. Maximum impact.
For serious calisthenics training at home, these are the ideal parallettes.
Handstand push-ups are a bodyweight exercise that requires a combination of strength, balance, and coordination. The essential steps to mastering handstand push-ups are described below. These steps essentially serve as a training plan for this exercise, especially if a handstand has not yet been mastered.
Please note that handstand push-ups are also known as "handstand dips" or "handstand presses". They are considered an advanced bodyweight exercise. By following the described procedure, achieving the first handstand push-up will take approximately 4 weeks.

1. Strengthen the upper body and core
First, strength must be built in the upper body and the entire core. This is achieved through exercises such as standard push-ups, dips, planks, or negative front levers on a pull-up bar. Ideally, all four of these exercises should be performed in 3 sets of 8-12 repetitions, 2-3 times per week.
2. Practice handstands against a wall
In parallel, the handstand should be practiced against a wall (i.e., standing in a handstand with the feet lightly touching the wall). This exercise helps to build familiarity with the handstand position and improves shoulder stability.
Once a secure handstand against the wall is achieved, the goal is to repeatedly push away from the wall and hold a freestanding handstand for as long as possible. This should be done 10 times, preferably over 2-3 sets, and ideally 2-3 times a week. A freestanding handstand means the feet do not touch the wall.
When a freestanding handstand can be held for 20 continuous seconds without touching the wall, the first handstand push-up can be attempted. Experience shows that these 20 seconds are necessary to even begin attempting the first handstand push-up.

3. Build targeted strength for handstand push-ups
Targeted strength for handstand push-ups must be developed. An excellent exercise for this is the pike push-up, which can also be varied in difficulty.
Pike push-ups are best performed in 3 sets of 2-8 repetitions per set (or simply as many repetitions as possible per set). They should be trained just as frequently as all other exercises, ideally 2-3 days a week.
Mastering a handstand is not required for pike push-ups. They can easily be performed parallel to regular handstand exercises. To adjust the difficulty level of this exercise, only the height of the toes above the floor needs to be changed.
Execution of pike push-ups: The toes are elevated to a certain height above the floor (e.g., by placing them on a plyo box, a chair, or a rung of a Swedish ladder). The palms are positioned on the floor as with normal push-ups, and the standard push-up movement is executed from this position. Throughout the movement, the upper and lower body should always form a (right) angle.

4. Practice negative handstand push-ups
Negative handstand push-ups should be practiced as soon as familiarity with the wall handstand has been established, sufficient shoulder strength has been built with pike push-ups, and a freestanding handstand can ideally be held for a few seconds.
Execution of negative handstand push-ups: Start in a handstand. Slowly lower the body by bending the arms until the head is close to the floor. From this position, return to a normal standing position. Take a short break and kick back up into a handstand to perform the next negative repetition. This is repeated 5 times for a total of 3 sets. Negative handstand push-ups should also be trained 2-3 times a week.
If sufficient strength is lacking, it is perfectly fine to lower into a headstand and then return to a normal standing position.

5. Perform the first handstand push-up
Once five clean negative handstand push-ups can be performed, the first full handstand push-up can be attempted. To do this, simply push the body back up into the starting position at the end of the negative phase. Once the first handstand push-up has been achieved from this position, the second, third, and all subsequent repetitions are not far away.
For the first handstand push-up, it is crucial to remain in the handstand position throughout the movement, regardless of the initial form. Once the movement feels comfortable and secure, the focus shifts to improving posture. The legs are fully extended, and the body is brought into a straight line, which makes the handstand push-up look highly aesthetic.
10-15 handstand push-ups are an outstanding achievement. In any calisthenics park, there will not be many people capable of performing this feat.
Conclusion and final remarks
The wall handstand can also be practiced against a door. By spreading and pressing the legs against the door frame, the execution can be supported slightly better, making it easier to push to the limit.
The last few centimeters (when the head is almost touching the floor) are the most difficult. Small elevations such as parallettes, handstand bars, wooden blocks, or thick books are extremely helpful here. They allow the head to go slightly lower, shifting the most difficult part of the execution more towards the middle of the movement.
For optimal results within four weeks, it is essential to train handstand push-ups consistently according to the steps outlined above. In the beginning, training under the supervision of a qualified partner or coach is also highly beneficial.
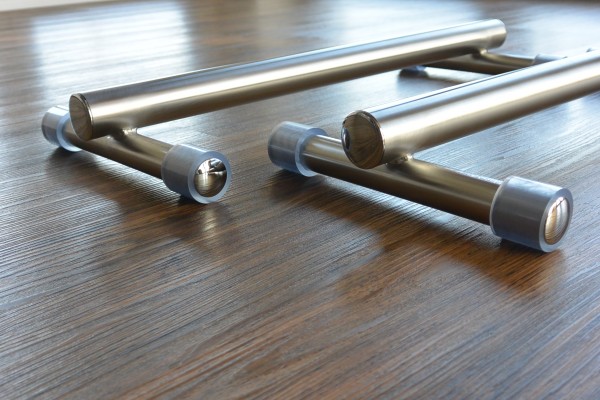
| Article | Parallettes, handstand bars, stainless steel mini parallel bars (1 pair) - 7.5 cm high, for floor placement |
| Description | |
| Distance between handstand bars | Freely selectable |
| Grip height while standing | 3 cm |
| Grip length on the handstand bar | Maximum 50 cm |
| Exercise difficulty | Very difficult to easy (depending on the position relative to and the distance between the bars) |
| Stability | Very high to unstable, depending on the position relative to and the distance between the bars |
| Maintenance | Absolutely maintenance-free and wear-free |
| Construction | Extremely stable, massive, fully welded stainless steel construction |
| Load capacity | Up to 300 kg (150 kg per bar) |
| Technical Data | |
| Material | Stainless steel (DIN 1.4301) |
| Height of the handstand bars | 7.5 cm |
| Width of the handstand bars / bases | 25 cm |
| Length of the handstand bars | 60 cm |
| Surface | Brushed |
| Tube | Ø 40 mm, wall thickness t=2 mm, ends closed with blanking plugs |
| Bases | With anti-slip silicone pads |
| Shipping weight | 5.0 kg |
| General Information | |
| Condition | New |
| Manufacturer | klimmzugstangen.de |
| Made in | Germany |
| Warranty | 20 years on welding seams |
| Mounting | Only suitable for placement on a stable, horizontal surface |
| Mounting material | Optional, not included in the standard scope of delivery |


")


")


